Showing posts with label Projects. Show all posts

Saturday, March 3, 2012

Cake Pops for Vday

This year, i decided to make cake pops for our vday project. Never made it before but did some research. I liked bakerella's recipe but i also looked at other blogs for directions.  Here is what the final product looks like:


Here are the ingredients I used and steps:


Step 1: Bake a simple cake
Step 2: Mix frosting into cake 
Step 3: Make round balls of cake mix and frosting and freeze for 15 minutes.

Step 4: Melt some candy melts and use stick to hold the cake.


Step 5: Decorate with Sprinkles 


Step 6: Let dry and wrap!


Tuesday, December 22, 2009

Homemade Jam


For Christmas this year, I decided to make homemade jam. A friend of ours made one last year for Christmas and I thought it was a pretty unique and thoughtful gift for friends and family. So, I looked on the internet to see how to make home canned jam, this website was very informative and comprehensive.

Supplies needed:

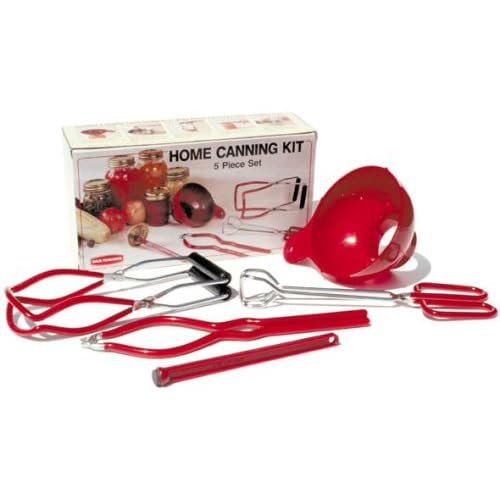
1) I bought this kit for $13 on amazon.com

:

2) I bought a box of home canning jars from Ralphs, they're about $10 for 12. They come in different sizes but I liked the 4oz and 8oz jars- they seem perfect for jam!


3) Instead of buying a canning pot, i used a regular pasta pot with a rack on the bottom of the pot.

I made 2 kinds of jam: Blackberry and pinapple, they are in season around this time of the year.  Also i made them with low sugar, the regular recipes seemed a little too high in sugar content.

Low-Sugar Pinapple Jam Recipe:
  • 4 Cups of finely chopped pinapple
  • 2 cups of sugar
  • 1 lemon (sliced)
  • 1 box of sureJell pectin

Low-Sugar Blackberry Jam Recipe:
  • 3 Cups of chopped blackberry
  • 1 cup of sugar
  • 1/4 cup of lime
  • 1 box of of no sugar needed SureJell Pectin

Directions:
  • Cook all ingredients in low heat, except (Pectin) for 15 minutes.
  • Add SureJell Pectin and cook for 5 minutes.
  • Pour hot jam over the sterilized jars and lids
  • Close jars and process in boiling bath as directed here in step 13. (This will seal the jars and allow the jam to be stored up to 12 months, but 6 months recommended)


I made 2 dozens of these!

Sunday, July 19, 2009

Packaging the Toffee...

Packaging the toffee was the fun part.I bought ready made kits fromMichaels, they come in different sizes. Here are some pics.


Saturday, July 18, 2009

Chocolate Almond Buttercrunch Toffee


Finally, I found a recipe that I liked, the key ingredient was the butter. I had to try different brands to get the results I wanted. The recipe is as follows:

  • 1 lb unsalted butter

  • ½ tea. table salt

  • 2 cups granulated sugar

  • 3 tbsp. water ( or 2 tbs of water, and 1 tbs of corn syrup)

  • 1 cup slivered almonds (do not use sliced almonds)

  • 12 oz. semi-sweet chocolate (chips are fine)

  • 1½ -2 cups lightly toasted pecans (or walnuts), finely chopped


Melt ¾ of chocolate over hot water or in a microwave oven at half power for 2-3 minutes. When melted, stir in remaining chocolate and set aside. Line a large jelly roll or half-sheet pan with heavy-duty foil and butter the foil.

Melt the butter with the salt in a heavy 3 quart saucepan over medium heat. Slowly add the sugar, stirring constantly with a wooden spoon. Add the water about halfway through this process.

After all the sugar is added, begin testing the mixture to see if the sugar is dissolved. Place a drop of mixture on wax paper; allow it to cool and rub it between your fingers to make sure it doesn’t feel grainy. If it does, continue to cook and test again. The mixture will probably be boiling at this point.

When sugar is dissolved, add the almonds, and increase the heat to medium high. Cook to the hard-crack stage, or about 310-320 degrees on a candy thermometer, stirring often to keep the candy from burning on the bottom. When it’s done, it should be a medium-dark amber color and have a caramel aroma. The almonds should have a toasted color but they should not burn. This is the tricky part, as there’s a thin line between perfect and overdone, and to some extent it’s a matter of taste.

Remove from heat and pour into the prepared pan, spreading as evenly as possible with an offset spatula. Be careful, this stuff is hot! Set the pan on a cooling rack. After 2-3 minutes, when toffee is just set, pour reserved chocolate on top and spread evenly. Sprinkle with chopped nuts, and press them in gently with a spatula or bottom of a glass to anchor them in the chocolate.

Allow the toffee to harden at least 6-8 hours—overnight is better. Break into pieces using a sharp pointed knife with a rigid blade, or you can use your hands. Store in an airtight container in a cool place. Makes about 3 pounds.

Chocolate: I tried to get Valhrona chocolate but the store was out. I tried this Scharffen Berger chocolate in  semisweet (62% cacao) and bittersweet (75%).

Fleur de sel: This is like the first time i have seen or used this. Its basically the best sea salt there is.  Here is some info on this salt:

Fleur de sel is a type of sea salt obtained by hand harvesting the "young" crystals that form on the surface of salt evaporation ponds. The harvesting of fleur de sel always takes place in the summer months when the sun is strongest. Most fleurs de sel claim to have higher mineral contents than table salts and often smell deliciously like the ocean.

Nuts: I got two types of almonds, slivered, and chopped. I roasted them to bring out the aroma and roasted flavors.

Thursday, July 16, 2009

Something Homemade Project Part II

For my second attempt, i didn't want to try anything fancy, just something simple that looks like a toffee. I tried another recipe from JoyOfBaking.com.

The results: They came out okay. The recipe was entirely used with brown sugar, so there was a strong molasses taste.  But i wasn't completely satisfied, it didn't taste like toffee, it tasted more like brittle.

joyofcooking

Monday, July 13, 2009

Something Homemade Project...Part I

A few of my friends decided to do a "something homemade project" . The requirements were simple, we had to make something from scratch, and then mail it to each other as a surprise.  I thought what can I possibly do that is decent and not scare people,  and i couldn't think of making anything except baking...but at least for the challenge, I wanted to make something I haven't done before.

I started by doing some research on what looked good. I looked at martha stewart.com and was ready to make something like this, and then I saw this post on buttercrunch toffee and fell in love! It looked pretty easy to do and so I said okay I am going to make a variation of it and make bite size toffee.

So, first thing, I went and bought a candy thermometer, and a candy mold from Michaels.

20090623-IMG_4512

20090623-IMG_4514

I followed the recipe for the toffee part and poured it to the mold. Then added chocolate chips, and nuts. Simple enough right?? Wrong!! The toffee came out very sugary, and the sugar crystalized. I did some reasearch and they said I needed to use wooden spoon to prevent that and stir as little as possible, bla bla bla. Okay fine, I'll try again. But here are the results...it was not buttery nor crunchy. More to come soon.

20090624-IMG_4525